

In today’s digital age, eCommerce is not just a luxury; it’s a necessity for businesses of all sizes. As more people shift to online shopping, creating an online store has become crucial for entrepreneurs and existing businesses alike.
WordPress, a platform once primarily known for blogging, has evolved into a robust and flexible platform suitable for building eCommerce stores.

In this guide, we’ll walk you through the steps to build your eCommerce store with WordPress, ensuring you’re well-equipped to tap into the vast world of online commerce.
Why Choose WordPress for eCommerce?
When thinking about launching an eCommerce store, many platforms come to mind. So, why should one gravitate towards WordPress?
- Flexibility and Customization: WordPress stands out due to its unparalleled flexibility. With thousands of themes and plugins, businesses can customize their store to their heart’s content, ensuring that it perfectly aligns with their brand and vision.
- Cost-Effective: While there are other dedicated eCommerce platforms, many come with recurring fees or transaction costs. With WordPress, once you have your website up, the only recurring costs might be hosting, domain, and perhaps some premium plugins.
- Integrated Blogging Capabilities: Content marketing is essential for driving organic traffic and positioning your brand as an authority. WordPress started as a blogging platform and still reigns supreme in this area, making it easy to integrate a blog into your eCommerce site.
- SEO Friendliness: With the right setup and plugins, WordPress can be incredibly SEO-friendly, helping your store rank higher in search results and attract more organic traffic.
- Large Community and Support: Given its vast user base, there’s a massive community of developers, designers, and everyday users available to offer support. Whether you’re encountering an issue or need recommendations, there’s a good chance someone has already found the solution.
- Scalability: One of the great advantages of WordPress is its scalability. As your business grows, your site can grow with it. From a few products to thousands, WordPress can handle it.
Selecting the Right Hosting
Choosing the right hosting provider is crucial for the success of your eCommerce store. A good host ensures that your website is fast, secure, and always available to your customers. Here’s what to consider:
- Performance and Speed: In the world of online shopping, every second counts. If your website is slow, potential customers may leave before making a purchase. Ensure your hosting provider offers solid performance, ideally with servers optimized for WordPress.
- Uptime Guarantee: Even a few minutes of downtime can result in lost sales. Look for a host with an uptime guarantee of 99.9% or higher.
- Security Measures: Given that you’ll be handling sensitive customer data and transactions, security is paramount. Ensure your host offers features like SSL certificates, daily backups, and protection against DDoS attacks.
- Scalability: As your store grows, so will the traffic and the need for resources. Opt for a hosting provider that allows easy scalability – be it through dedicated hosting, VPS, or cloud solutions.
- Customer Support: No matter how tech-savvy you are, issues can arise. A host with responsive, 24/7 customer support can be a lifesaver.
- Specialized WordPress Hosting: Some hosting providers offer services tailored for WordPress sites. These might come with features like one-click WordPress installations, automatic updates, and specific performance optimizations.
- Pricing: While it might be tempting to go for the cheapest option, remember that with hosting, you often get what you pay for. Instead, balance your budget with the needs of your store.
- E-commerce Features: Some hosts provide specific tools beneficial for eCommerce, like dedicated IP, PCI compliance, and more.
Setting Up WooCommerce
WooCommerce is the go-to plugin for creating an eCommerce store on WordPress. Not only is it free, but it’s also versatile, customizable, and integrates well with numerous other plugins. Here’s how to set it up:
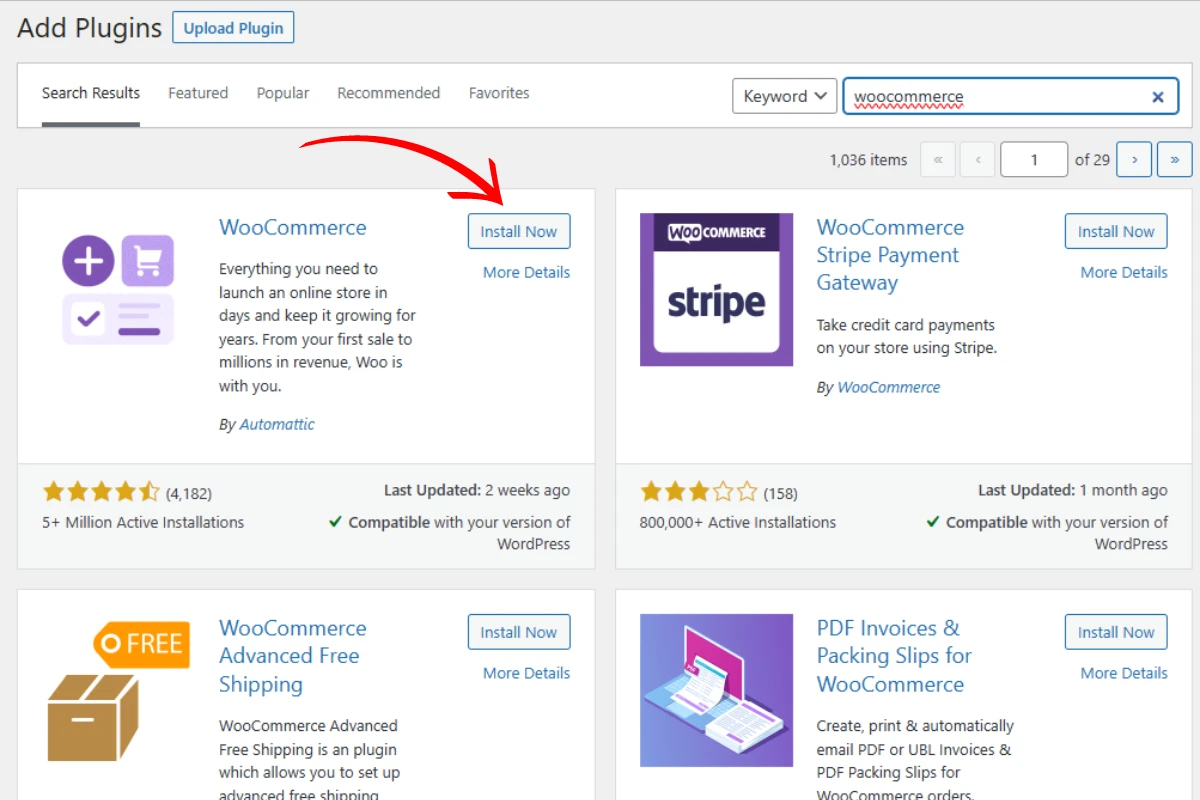
- Installation:
- Navigate to your WordPress dashboard.
- Go to Plugins > Add New and search for “WooCommerce”.
- Click Install Now and then Activate once the installation is complete.
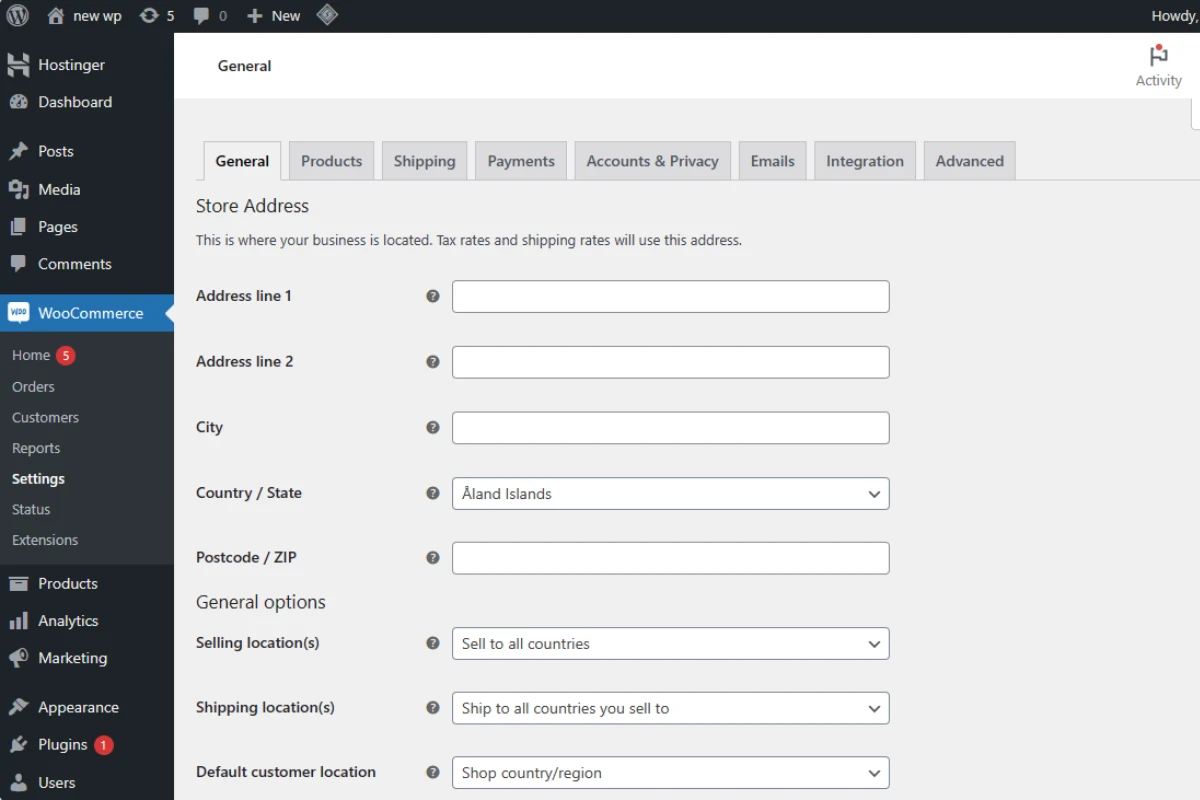
- Setup Wizard:
- Upon activation, WooCommerce will launch a setup wizard to help you configure your store’s basic settings, such as location, currency, payment methods, and shipping options.
- Walk through the steps, filling out the necessary information.
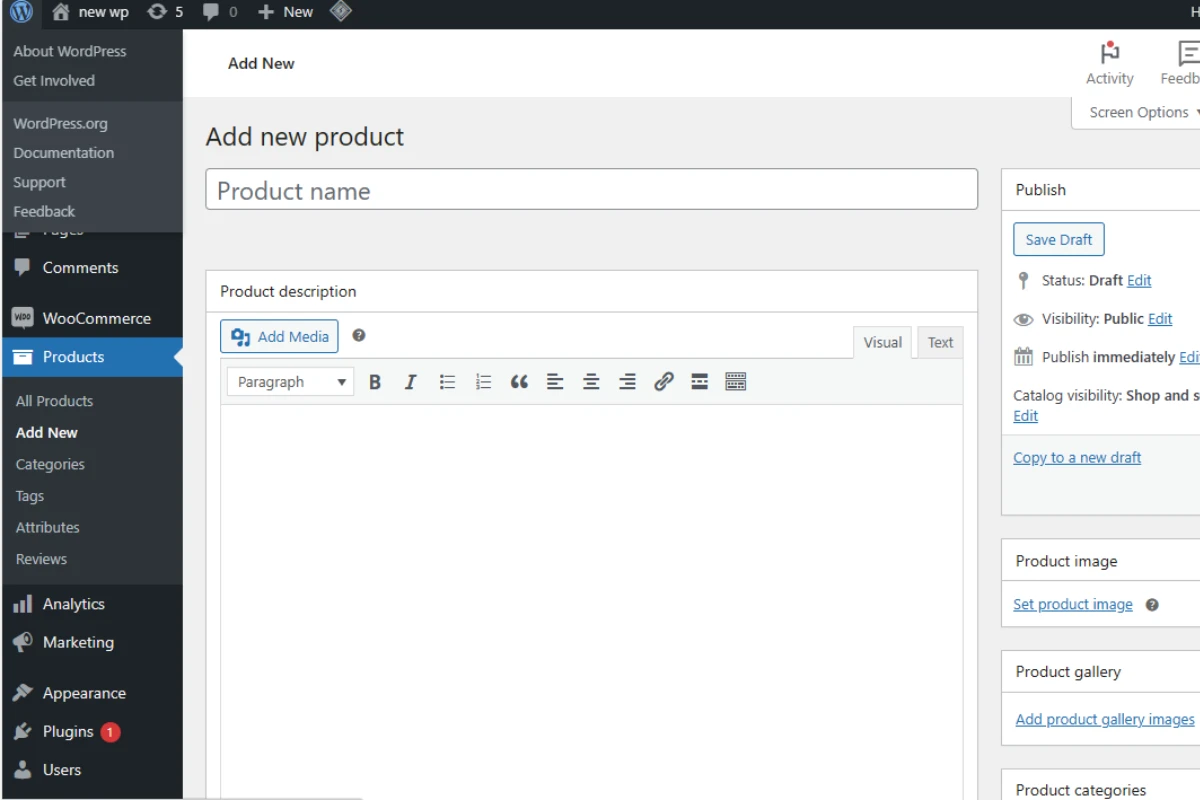
- Adding Products:
- In the dashboard, go to Products > Add New.
- Provide a product name, detailed description, product images, and set the right price.
- You can also categorize products, add tags, and configure inventory settings.
- For variable products (like a t-shirt available in different sizes and colors), use product attributes and variations.
- Configuring Checkout Settings:
- Under WooCommerce > Settings > Checkout, you can customize checkout options, including the checkout process, payment gateways, and more.
- Implementing Shipping Options:
- Under WooCommerce > Settings > Shipping, set up your shipping zones, methods, and rates.
- Setting Up Taxes:
- Configure tax settings in WooCommerce > Settings > Tax. This can be automated with plugins or manually set, depending on your preference and business needs.
- Extensions and Add-ons:
- WooCommerce boasts a wide array of extensions that can further enhance your store’s capabilities, such as booking systems, subscription models, or custom product add-ons.
- Theme Integration:
- While WooCommerce works well with most WordPress themes, it’s beneficial to opt for a WooCommerce-optimized theme. This ensures seamless integration and an optimized user experience.
Designing Your Store
The design of your online store plays a pivotal role in the user experience and can heavily influence a potential customer’s decision to make a purchase. With WordPress and WooCommerce, you’re spoiled for choice when it comes to design possibilities. Here’s how to approach it:
- Choosing a Theme:
- Start by selecting a WooCommerce-compatible theme. Sites like ThemeForest or the WordPress theme repository offer a myriad of options, both free and premium.
- Ensure the theme is responsive, so your store looks good on desktops, tablets, and mobile devices alike.
- Customization:
- Use the WordPress Customizer (under Appearance > Customize) to tweak colors, fonts, header, and footer configurations to match your brand’s identity.
- Some themes come with built-in page builders, like Elementor or WPBakery, allowing for drag-and-drop customization.
- High-Quality Images:
- Invest in high-resolution product images. Consider multiple angles or even 360-degree views for a comprehensive look.
- Use image optimization plugins like ShortPixel or Smush to ensure your images load quickly without compromising quality.
- User-Friendly Navigation:
- Organize your products into clear categories and use a straightforward site structure.
- Implement breadcrumbs for easy site navigation and enhanced SEO.
- Engaging Product Descriptions:
- Avoid manufacturer descriptions. Write unique, engaging, and informative product descriptions that provide value to the customer.
- Calls-to-Action (CTAs):
- Use clear and compelling CTAs like “Add to Cart”, “Buy Now”, or “Learn More” to guide users towards making a purchase or obtaining more information.
- Mobile Optimization:
- Ensure your store is mobile-friendly. More people now shop on mobile devices, so a seamless mobile experience is crucial.
- Feedback and Testing:
- Before launching, gather feedback on your store’s design from friends, family, or even potential customers. Use their input to make necessary refinements.
- Consider A/B testing different design elements to see what resonates best with your audience.
Adding Products
Having your store set up and looking great is only half the battle; the next big step is populating it with your products. WooCommerce makes this process intuitive and offers a range of options to cater to different types of goods. Here’s a step-by-step guide:
- Navigating to Products:
- In your WordPress dashboard, go to WooCommerce > Products and click on the ‘Add New’ button.
- Product Details:
- Title & Description: Start by adding the product name in the title field. Follow this with a detailed and engaging product description.
- Product Data: Here, you can set the product type (simple, grouped, external/affiliate, or variable), set pricing, manage inventory, assign shipping details, and more.
- Product Categories & Tags:
- Create categories to organize your products efficiently. This not only helps in better site navigation but also benefits SEO.
- Use tags to further classify products based on specific attributes or features.
- Product Images & Galleries:
- Set Product Image: This will be the primary image customers see in the product listings.
- Add Product Gallery Images: These additional images offer different views or variations of the product, allowing customers to get a fuller understanding of what they’re purchasing.
- Attributes & Variations (for Variable Products):
- If you have products that come in different sizes, colors, or other variations, you can set these up using attributes and then define each variation’s specifics (like pricing, stock status, and more).
- Additional Options:
- Short Description: This brief summary appears next to product images on the product page and can be essential for quick customer insights.
- Linked Products: You can set up upsells (alternative products) and cross-sells (complementary products) to increase your store’s average order value.
- SEO & Optimization:
- Use an SEO plugin to optimize product titles, descriptions, and URLs.
- Ensure your product descriptions are unique and keyword-rich.
- Publishing & Preview:
- Before publishing, use the ‘Preview’ button to see how the product will appear to customers.
- Once satisfied, hit ‘Publish’ to make the product live on your site.
Payment Gateways and Checkout Process
Selecting the right payment gateway is crucial for any eCommerce store. It ensures that the transaction process is smooth and trustworthy for your customers:
- Choosing a Payment Gateway: Options such as PayPal, Stripe, Square, and many others are available. Your choice should reflect your target audience’s preferences and the regions you are operating in.
- Simplified Checkout: Reduce the steps needed for checkout. The easier it is for customers to make a purchase, the less likely they’ll abandon their carts.
- Guest Checkout: Always provide an option for users to checkout without creating an account. It reduces friction in the buying process.
Optimizing for Mobile
With an increasing number of shoppers using mobile devices, ensuring your store is mobile-friendly is not just an option but a necessity:
- Responsive Design: Your store’s design should adapt to various screen sizes. Many modern WordPress themes offer this out-of-the-box.
- Mobile Testing: Regularly test your store on different devices to ensure a seamless shopping experience.
- Accelerated Mobile Pages (AMP): Implementing AMP can drastically improve your store’s loading speed on mobile devices.
Implementing Security Measures
Your eCommerce store will handle sensitive customer data. Ensuring its security is paramount:
- SSL Certificate: Always use an SSL certificate to encrypt data between the user’s browser and your server.
- Regular Backups: Schedule daily or weekly backups of your website to safeguard against data loss.
- Security Plugins: Consider plugins like Wordfence or Sucuri Security for an added layer of protection.
SEO for Your Store
To drive organic traffic to your store, optimizing for search engines is essential:
- Keyword Research: Understand what potential customers are searching for and optimize your product listings accordingly.
- Quality Content: Regularly publish relevant content, like blog posts related to your products, to establish authority.
- Site Speed: Ensure your site loads quickly. Slow-loading pages can hurt both user experience and SEO.
- Structured Data: Implement schema markup to provide search engines with detailed product information.
Conclusion
Building an eCommerce store with WordPress is not just about setting it up but ensuring it’s optimized, secure, and provides a seamless experience for your visitors. Whether you’re venturing into the eCommerce realm for the first time or are a seasoned store owner, there’s always room for improvement. At WPSiteMakers, we understand these nuances and are committed to offering the best guidance and services to ensure your store not only stands out but also thrives in this competitive landscape.